Tuesday, June 26, 2012

Lemon Basil Tomato Pesto Pasta with Shrimp

Lemon Basil in the garden....

Southern Ontario is experiencing a wonderfully warm and steamy summer so far, which means that it's only June 23 and my garden looks like the 'after' picture from a Miracle Grow commercial.  This weekend I was delightfully surprised to find that my lemon basil plant already had enough leaves to make pesto....(YAY!). 

A couple of years ago, on one of my yearly trips to Florida, my aunt made this memorable Tomato Pesto Pasta with Shrimp.  You know how some dishes (for whatever reason) just stick with you (this happens to me all the time)....this pasta dish was no exception.  So I thought I'd take a crack at replicating it....and it turned out to be a TOTAL SUCCESS.

This recipe will give you left over pesto, which can stay in the fridge for a few weeks.  It has a fresh taste (from the lemon basil) and light richness (from the roasted garlic and roasted tomatoes) that would be great with baked fish, baked chicken, as a spread on a baguette (mmmm, baguette)....etc.
Mmmmmm...pasta....
Lemon Basil Tomato Pesto Pasta with Shrimp

Ingredients:

20 cloves of garlic, peeled
1/2 cup of olive oil, plus a little more for roasting tomatoes
1 pound cherry tomatoes, washed and drained
1/4 cups + 2 tablespoons pine nuts
1/4 grated Parmesan
Salt and pepper
1 cup packed lemon basil leaves, rinsed and drained (regular basil will work just as well)
1 package of brown rice spaghetti (standard package is 454g)  (any pasta will work here - just modify the cooking time according to the package instructions)
1 pound large shrimp, shelled and deveined

Directions:

Pesto:
(1) Preheat oven to 375 degrees
(2) Place garlic in a single layer in a small baking dish
(3) Add 1/2 cup of olive oil to the dish, making sure all of the garlic cloves are coated
(4) Cover the baking dish with foil.  Roast garlic cloves in the oven for 45 minutes until fragrant and golden brown
(5) In a medium sized baking dish, toss the cherry tomatoes with enough olive oil to lightly coat (about 2 tablespoons)
(6) Place the tomatoes in the oven (at the same temperature --- 375 degrees) and roast (uncovered) for 25 minutes
-Tomato skin should be blister-y when they are ready
Roasted Tomatoes...
(7) While the garlic and tomatoes are roasting in the oven (your kitchen should smell really yummy by now), in a small fry pan on the stove, over medium heat, toast all of the pine nuts for about 15-20 minutes or until they are golden brown, turning occasionally so they don't burn…
-pine nuts should to be toasted before using.  There is this thing called 'pine nut mouth' that is not dangerous, but will mess with your tastebuds for a couple of days – which is not fun...

Toasting pine nuts...
(8) When the garlic is nicely roasted, remove the baking dish from the oven and remove the garlic cloves from the oil (both the garlic and the oil will be HOT so be careful).  Set the garlic aside in a small bowl.  Reserve the oil for use later.

          
Roasted garlic cloves on the bottom, garlic infused olive oil on the top...
       
(9) In a food processor, blend the roasted garlic and 1/4 cup of the toasted pine nuts until creamy
(10) Add the roasted tomatoes to the food processor (not including the olive oil from the dish the tomatoes were roasted in – this will make your pesto too liquidy) and lemon basil leaves.  Blend until smooth.
(11) Add the Parmesan.  Blend until smooth.
-while the food processor is running, add 1-2 tablespoons of the garlic infused olive oil.  This helps to bring everything together and enhances the garlic flavour.
(12) Your pesto should be the consistency of a paste now.  Season for salt.

Lemon Basil Tomato Pesto....
 Note: you will have leftover pesto. 

Pasta:
 (13) In a large pot of boiling salted water, cook pasta, stirring occasionally, until almost tender, about 8-10 minutes
-I find that brown rice pasta is super starchy.  When water is super starchy, pasta will stick together - so make sure you are using a big enough pot with plenty of salted water to assist with constantly moving the starch away from the pasta surface.
-Salt your water people.  Adding salt now will reduce the amount of salt/cheese/butter you will have to add later.
(14) Reserve about a 1/2 cup of the pasta water prior to draining the cooked pasta
-this will be used to aid in the when tossing the pasta with the rest of ingredients later....

Shrimp: (can be done while pasta is cooking)
(15) In a small fry pan over medium-high heat, add 2 tablespoons of the garlic infused oil
(16) Season the shrimp with pepper and sauté until the shrimp turn pink (about 5-6 minutes....don't overcook - rubbery shrimp is never good...)
(17) Remove from heat


(18) In a large bowl, add the cooked pasta, and some of the pesto (I usually put 3-4 heaping spoonfuls - about a 1/4 of the total amount of pesto that this recipe makes).  Toss to coat the pasta with pesto.  If needed, add a bit of the pasta water to make tossing easier. 
(19) Add the shrimp and lightly toss just to coat the shrimp.
(20) Season for salt and pepper
(21) Garnish with the 2 tablespoons of leftover toasted pine nuts. 
Optional - serve with chilli flakes and lemon wedges on the side


Nutritional Information (for one serving - 1/5 of the final product):
Calories 583
Fat 19g
Carbs 76g
Fibre 5g
Protein 27g
WW Points 15

Happy Cooking!

Thursday, June 14, 2012

Dairy Free Berry Cupcakes


I have a little munchkin in my life who can't have dairy.  Now, I imagine that it’s hard to avoid dairy when you have a kid, considering all of the ready made foods and snacks out there that kids love which contain dairy....and I knew I would be seeing his mama so I thought I would send these along with her for him to try - Dairy Free Berry cupcakes.   Fresh berries are in abundance at this time of year in Ontario, which is perfect for this recipe.....


Dairy Free Berry Cupcakes
(Adapted from 500 cupcakes)
Serves 12


Ingredients:

2 1/2 cups mixed fresh berries (blueberries, strawberries, cranberries, blackberries - I used blueberries, and strawberries)
2 cups all purpose flour
1/2 cup packed brown sugar
1 tbsp baking powder
2 tsp vanilla extract
1/2 tsp almond extract
4 tbsp vegetable oil
2 lightly beaten eggs

1/2 cup mixed berry jam

Directions: 

(1) Preheat the oven to 350 degrees
(2) Line a muffin pan with cupcake liners
(3) In a food processor, puree 1 1/2 cups of the berries until smooth
(4) in a small bowl, dice up the remaining berries
Diced strawberries...
(5) In a medium mixing bowl, combine the flour, sugar and baking powder; set aside
(6) In a large mixing bowl, combine the eggs, oil, vanilla and almond extract
(7) Add the puréed berries to the wet ingredients
(8) With a spatula, fold in the dry ingredients
(9) Fold in the remaining diced berries
(10) Spoon the batter into the cups
-I put about a heaping 1/4 cup of batter in each cupcake cup...they will rise a bit as they are baking...
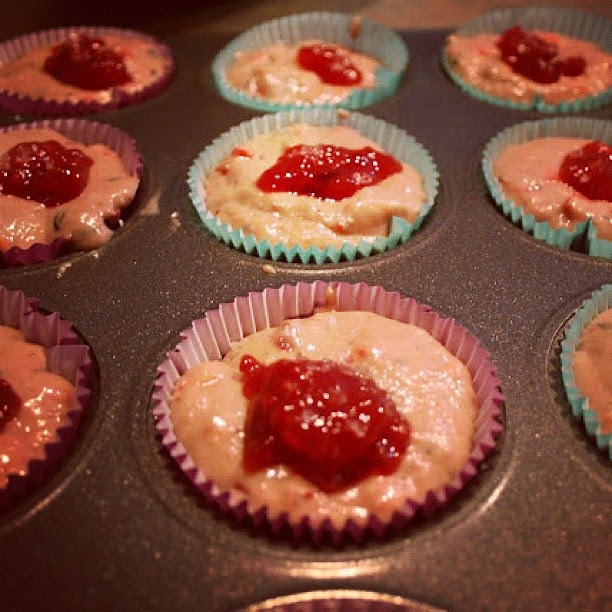
(11) Top each cupcake with a teaspoon of jam
-I used the Smuckers 'no sugar added' Strawberry variety
Ready to bake!

(12) Bake for 20 minutes or until toothpick is dry
(13) Remove pan from oven and cool for 5 minutes
(14) Remove the cupcakes and cool completely on a rack
-These can be stored in an airtight container for up to 3 days & frozen for up to 3 months...


Nutritional Information (for one cupcake):
Calories 199
Fat 5.5g
Carbs 33.2g
Fibre 1.7g
Protein 3.2g
Sugar 15.6g
Sodium 92.7mg
WW points 5

Optional - If you are not too concerned about your sodium intake, I put a couple of large salt crystals on top of the strawberry jam (prior to baking) to add to the flavour dimensions...

There are a couple of yummy alternatives to the berries:
Peach and berry cupcakes
-substitute 1 1/2 cups canned peaches - puréed, for 1 1/2 cups of the mixed puréed berries
Apple and berry cupcakes
-substitute 1 1/2 cups unsweetened apple sauce for 1 1/2 cups of the mixed puréed berries
-I haven't tried this version - but when I do I might add some cinnamon and a pinch of nutmeg....

Happy Cooking! 

Sunday, May 27, 2012

Blue Hydrangea Red Velvet Cake


I think I could sum up this post with two words....'lesson learned.'

Last weekend was Victoria Day here in Canada.  Which means that it was the first long weekend of the summer.  My pregnant cousin happened to be visiting from Calgary (that's in the province of Alberta for those of you who need to brush up on your geography).  And since this was probably the last time we would see her before she had the baby, the visit called for a Baby Shower! 

She's having a boy, so I thought that some sort of blue cake was in order.  I took my Red Velvet cake recipe, replaced the red food colouring with Wilton's Royal Blue food colouring and a dab of Wilton's Violet food colouring to make (are you ready...?) - Blue. Velvet. Cake. 
Once baked, the cake was a lovely rich royal blue colour and it even tasted great (I sort of expected it to taste 'blue').  For some reason, while I was sampling the cake, I caught a reflection of myself in the mirror - my tongue was royal blue, my lips were royal blue, even my teeth were royal blue.  (French accent - ahhh...horrible!) 
So after drinking a tonne of water and brushing my teeth (a couple of times) (...with the fancy whitening toothpaste),  I decided to scrap the idea and go back to the original 'tried and true' red velvet cake recipe.

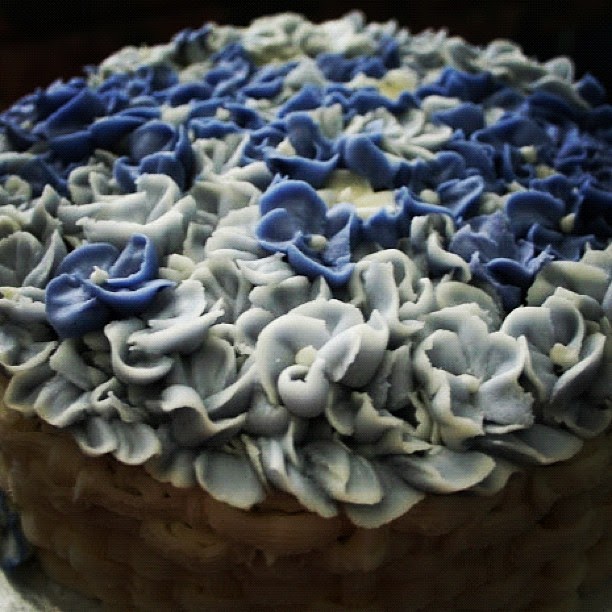
I played around with a couple of icing techniques and (since she's having a boy) went with various shades of blue hydrangea's.   


The cake was devoured within minutes (seriously...I should have timed it) and I received lots of compliments (win!). 

I find that sometimes these mistakes are necessary for the learning process - and now I know what to do to make a person’s teeth blue...(I am going to put that into the ‘funny practical jokes’ bank)...
Maybe next time I try to make a blue cake (...I'm sure there will be a next time) I will go for a baby-blue shade instead of trying to poison myself with blue food colouring to make a royal blue cake....

Happy Cooking!

Thursday, May 24, 2012

Guyanese Custard Block

(I should probably premise this story with the fact that I am the Canadian born offspring of two Guyanese parents)...

It was my Dad's birthday a few months ago.  He's one of those people who doesn't really like a big fuss on their birthday (which I don't understand - I feel as though my birthday should be a national holiday).  Because he doesn't like a big fuss, we try to keep it low key, but special.

This year, I decided to flip through this Guyanese cookbook we had (dated 1973) and attempt something for dessert for his birthday from 'home' (anyone with Guyanese family living abroad knows that Guyana is referred to as 'back home' or just 'home')....
I love crazy cookbooks like this....you just never know what you might find in them!
In it, I found a recipe for something called 'Custard Block'.....

I thought this recipe was great for a couple of reasons (1) Because it's called 'Custard Block'...that's exactly what it is.  A block of frozen custard.  And (2) because it's main ingredient is something called 'Bird's Custard Powder'.  Now, Birds Custard Powder brings back many memories from my childhood.  It's one of the first things that my Mom would let me make on my own.  It’s a custard powder, which when you add milk and sugar to it over heat - makes this gloop-y yellow custard that my dad LOVES with any sort of pie or crumble (there were equal parts pie and custard in his bowl)...


Custard block is like ice cream without all the work.  I used fat free evaporated milk, which really lightened the recipe up.  It's a great summer dessert and really easy to make.  

Fat-free goodness....
Guyanese Custard Block
Adapted from 'What's Cooking in Guyana' Cookbook
Serves 6
 
Ingredients:

Two 12oz cans of fat free evaporated milk (could use the full fat evaporated milk as well...).
3 tbsp Birds Custard Powder
3 tbsp brown sugar
1/2 tsp cinnamon
1/4 freshly ground nutmeg
1/2 tsp almond extract
1 tsp vanilla

Directions:

(1) In a medium pot, whisk together all the ingredients.
(2) Put the mixture on the stove and turn on heat to medium-high.
(3) Stir constantly.  The idea here is to heat the custard mixture until it thickens slightly.  (on average - 8-9 minutes)
-if you don't continuously stir, it will get too lumpy quickly (and you'll have to start all over!)
-The mixture is ready when it coats the back of the spoon and doesn't pull away from the edges of the spoon...
Not ready....

See how it's pulling away from the edges of the spatula?.....Still not ready.....
Ready!
(4) As soon as mixture has started to thicken, remove from heat and pour into the desired container. 
-I used a mini muffin pan.  Other ideas for containers are - popsicle holders, ice cube trays, mini pie plates, ramekins.... 
(5) Freeze for at least 5-6 hours
(6) When ready to serve, remove from freezer and run the bottom of contain through warm water to loosen the custard block to make it easy to pop out. 
-Optional - when serving , sprinkle with a smidge of cinnamon.
Custard Block!  Ready to serve....
Nutritional Information (for one serving - 1/6 of the final product):
Calories 151
Fat 0.2g
Carbs 28.3g
Fibre 0.1g
Protein 8.2g
WW Points 3

Happy Cooking!

Thursday, May 17, 2012

Springtime Asparagus & Ham Pasta

It's Spring here in Can-adia.  Spring (to me) means that it's time to get the gardening on (hot peppers, tomatoes, herbs and the such), get a pedicure (to take care of the gnarled-winter-toe situation) and pull out the floaty spring dresses from last year.  It also means that for the next 4-5 months, the vegetables will taste a million times better than they do in the winter.

I found this recipe in a Foodland Ontario calendar that I have hanging in my cubicle at work....The calendar features a new recipe every month using one of the many Ontario fruits and vegetables that happens to be in season.  This month (May) it's Asparagus....This recipe is simple, really tasty and only takes about 30 minutes to prepare, so it's perfect for a weeknight dinner.


I find that asparagus has the beneficial side effects of reducing that ever-annoying water weight gain that happens once-in-a-while  (which is a WIN in my opinion)- I don't know if this is actually a real thing or just my imagination...either way, it is great when trying to fit into last year's spring/summer dresses!... And I am sure you don't need me to tell you that Asparagus is just plain good for you (even if it does make certain 'things' a little smelly).....

Springtime Asparagus & Ham Pasta
(modified from Foodland Ontario 2012 calendar)
Serves 5

Ingredients:

3 cups brown rice penne pasta (you could also use regular pasta, just modify the cooking time)
1 bunch of Asparagus, trimmed and cut into 1-inch pieces
                - to trim asparagus -  take the ends of the asparagus between your thumb and forefinger and bend until it breaks (should be bottom 1-2 inches of each spear) – this removes piece of the asparagus spear which is too hard to eat.
2 tbsp butter
1 onion, diced
3 tbsp flour
1 cup low sodium chicken stock (I cheated (gasp!) and used chicken stock from a cube)
1 cup skim milk
1 cup smoked ham, diced (I used a Maple Leaf’s low fat smoked ham steak)
1 tbsp grated lemon rind
1 tsp Dijon mustard
1 tsp fresh thyme, removed from stems and finely diced (I had just planted fresh lemon thyme in the garden, so I used that to give it an extra lemony kick...)
Freshly cracked black Pepper (to taste)
Pinch of freshly grated nutmeg
1 cup Parmesan (any sharp cheese would work...I just happened to have loads of parm in the fridge)
Chilli flakes for serving (optional)

Directions:

(1) In a large pot of boiling salted water, cook pasta, stirring occasionally, until almost tender (about 8 minutes)
-I find that brown rice pasta is super starchy.  When the boiling pasta water is super starchy, the pasta will stick together - so make sure you are using a big enough pot with plenty of salted water.  This will help the starch to keep moving instead of resting on the pasta surface.
 -Salt your water people!  Adding salt now will reduce the amount of salt/cheese/butter you will have to add later to the sauce.
(2) Add the chopped up Asparagus to the boiling pot.  Cook for another 4-5 minutes until both pasta and asparagus are tender. 
-Don't overcook.  Overcooked asparagus is never good.
(3) Drain the noodles and asparagus; set aside in a large bowl.
(4) Combine the chicken stock and milk in a container; set aside.
(5) In a medium-sized sauce pan on medium-high heat, melt butter.
(6) Add the diced onion to the pan and cook until softened - about 3 minutes.
(7) Stir in flour and let toast for a couple of minutes.
(8) Slowly whisk in milk and broth mixture;  bring this mixture to a simmer (this will thicken it up).  Simmer for about 1-2 minutes, stirring often.
(9) Add the diced ham, lemon rind, mustard, thyme and pepper.  Simmer for 5 minutes, stirring occasionally.
-if the sauce gets too thick - add a bit more milk and put the cover on the pot.
(10) Add nutmeg and the Parmesan cheese to the sauce.  Combine until the cheese is melted.   Remove from heat.
(11) Pour sauce over pasta and asparagus;  Toss well.  
-Serve with chilli flakes for an extra layer of flavour.


Weight watchers points per serving: (I am a big fan of WW.  I've never been on it, but I've seen it work wonders on friends and colleagues...) 9

Happy Cooking. 

Friday, May 4, 2012

Spelt Breaded Pork Chops with Spicy Citrus Marinade

This recipe is from the Sauces and Marinades class that I took.  It’s a quick and easy marinade to put together.  Keep in mind that marinating the pork chops overnight will make a world of difference. 


In class, we grilled these - which was good.  Personally I love breaded pork chops.  I used spelt bread crumbs because I eat a lot of spelt bread, and when it goes stale, I make breadcrumbs out of it (oven dry them, then blend them up in a food processor) - Also, I've heard that spelt is good for you.......so there's that too.  I employed my oven frying skills to make sure the breaded pork chops were nice and crispy without adding too much fat.

These pork chops are great with apple sauce and boiled & pan fried potatoes (pictured above). 

Spelt Breaded Pork Chops with Spicy Citrus Marinade
(adapted from Sauces and Marinades George Brown College Manual)
Serves 4

Ingredients:

4 pork chops (7-8 oz each)
1 cup orange juice (pinapple or papaya juice would work as well)
2 tsp freshly ground black pepper
1/2 tsp chilli powder
1/2 tsp paprika
1/2 ground coriander
1/4 tsp mustard powder
1/8 tsp cayenne pepper (leave this out if you don't want the pork chops to have a bit of a kick...)
2 tbsp coriander leaves, chopped
Salt
1 egg
2 cups spelt bread crumbs (any breadcrumbs will do)
Salt and pepper for the breadcrumbs (optional)
 
Directions

(1) Rinse out pork chops in cold water.  Let drain in strainer.
(2) In a flat-ish bowl, whisk together orange juice, black pepper, chilli powder, paprika, coriander, mustard powder, cayenne pepper and coriander leaves. 
(3) Salt to taste
-I try to make sure that this marinade is just a smidge on the salty side, as I don't add any more salt through the rest of the cooking process (you could, I just don't)
(4) Add pork chops to marinate, turning once to coat.   Place in fridge to marinate overnight.
-a couple of hours will do for marinating as well, but as I've said before, overnight is best
  
A flat bowl for marinating will ensure that the maximum surface area of the pork chop is covered with the yummy spicy citrus marinade...
Once the pork chops have finished marinating; remove from fridge and set on the counter for 15-20 minutes prior to cooking. 

(5) Preheat oven to 425 degrees
(6) In a shallow bowl, whisk egg.  Set aside.
(7) Put the bread crumbs in a plate.  Season for salt and pepper (optional).
(8) Line a baking sheet with parchment paper.  Pour a couple of teaspoons of your favourite cooking oil (I use canola - peanut or grapeseed oil would work well too) on parchment paper.  Using a pastry brush, spread oil all over parchment paper.  Set aside.
 -The oil doesn't have to form a 'coat' over the entire surface area of the parchment paper...spreading around the couple of teaspoons of oil with a pastry brush will do....
(9) Remove a pork chop from marinade.  Hold it over the marinade bowl for a few seconds so most of the marinade drips off. 
(10) Coat both sides of pork chop in egg wash
(11) Coat both sides of pork chop in breadcrumbs
(12) Place breaded pork chop on oiled parchment paper.  Repeat the above steps (9, 10 & 11) for the rest of the pork chops.
(13) Once all pork chops are breaded, drizzle about 1/2 tsp of oil on the top of each one (no need to spread it around).

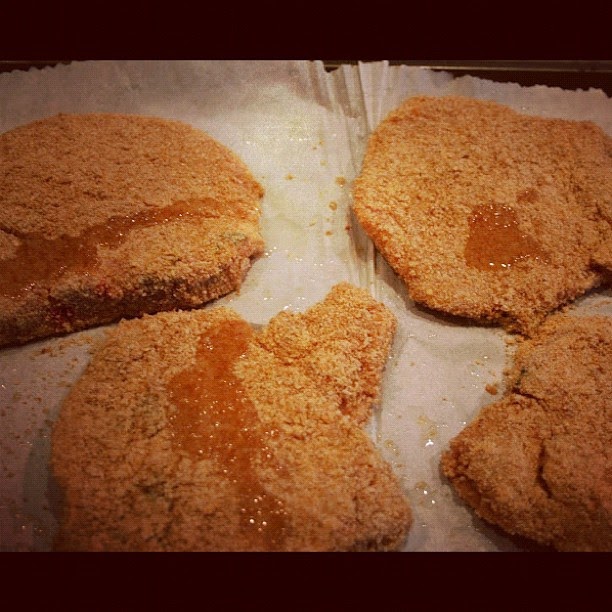
Ready to oven fry!

(14) Put baking sheet into preheated oven.
(15) Bake for 20 minutes.  Turn over gently (using a flat spatula) so as not to disturb breading.
(16) Once flipped, bake for 10-15 more minutes. 
-The idea is to get the crust to set without deep frying it.  The longer cooking times will ensure this.  If you fiddle with it too early, the breading will come off and you will no longer have breaded pork chops - You’ll have pork chops with some breading on them….    
-After this 10-15 minutes, the pork chops will be cooked and the crust will be set.  What I do then is switch the broiler onto high and let them brown to get that 'crispy on the outside, juicy on the inside' effect...(make sure you watch this as they will go from brown to burn quickly!).  

Remove from the oven and serve.

These are great as left overs the next day....just warm em up in a pan and serve.

Happy Cooking!