Showing posts with label Breakfast. Show all posts

Thursday, June 14, 2012

Dairy Free Berry Cupcakes


I have a little munchkin in my life who can't have dairy.  Now, I imagine that it’s hard to avoid dairy when you have a kid, considering all of the ready made foods and snacks out there that kids love which contain dairy....and I knew I would be seeing his mama so I thought I would send these along with her for him to try - Dairy Free Berry cupcakes.   Fresh berries are in abundance at this time of year in Ontario, which is perfect for this recipe.....


Dairy Free Berry Cupcakes
(Adapted from 500 cupcakes)
Serves 12


Ingredients:

2 1/2 cups mixed fresh berries (blueberries, strawberries, cranberries, blackberries - I used blueberries, and strawberries)
2 cups all purpose flour
1/2 cup packed brown sugar
1 tbsp baking powder
2 tsp vanilla extract
1/2 tsp almond extract
4 tbsp vegetable oil
2 lightly beaten eggs

1/2 cup mixed berry jam

Directions: 

(1) Preheat the oven to 350 degrees
(2) Line a muffin pan with cupcake liners
(3) In a food processor, puree 1 1/2 cups of the berries until smooth
(4) in a small bowl, dice up the remaining berries
Diced strawberries...
(5) In a medium mixing bowl, combine the flour, sugar and baking powder; set aside
(6) In a large mixing bowl, combine the eggs, oil, vanilla and almond extract
(7) Add the puréed berries to the wet ingredients
(8) With a spatula, fold in the dry ingredients
(9) Fold in the remaining diced berries
(10) Spoon the batter into the cups
-I put about a heaping 1/4 cup of batter in each cupcake cup...they will rise a bit as they are baking...
(11) Top each cupcake with a teaspoon of jam
-I used the Smuckers 'no sugar added' Strawberry variety
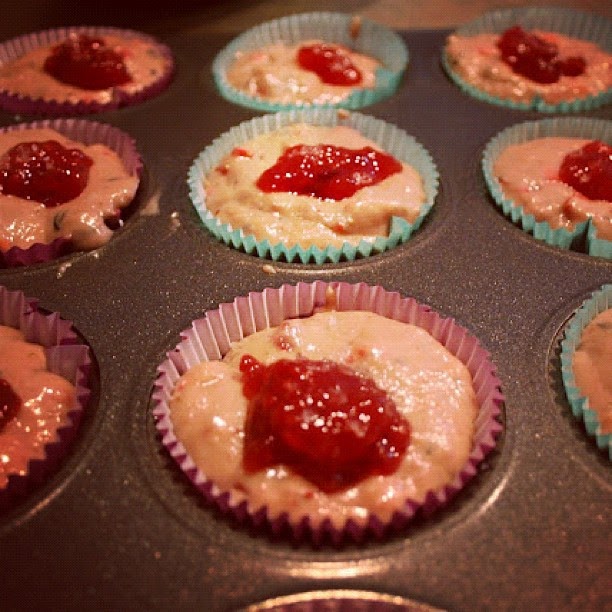
Ready to bake!

(12) Bake for 20 minutes or until toothpick is dry
(13) Remove pan from oven and cool for 5 minutes
(14) Remove the cupcakes and cool completely on a rack
-These can be stored in an airtight container for up to 3 days & frozen for up to 3 months...


Nutritional Information (for one cupcake):
Calories 199
Fat 5.5g
Carbs 33.2g
Fibre 1.7g
Protein 3.2g
Sugar 15.6g
Sodium 92.7mg
WW points 5

Optional - If you are not too concerned about your sodium intake, I put a couple of large salt crystals on top of the strawberry jam (prior to baking) to add to the flavour dimensions...

There are a couple of yummy alternatives to the berries:
Peach and berry cupcakes
-substitute 1 1/2 cups canned peaches - puréed, for 1 1/2 cups of the mixed puréed berries
Apple and berry cupcakes
-substitute 1 1/2 cups unsweetened apple sauce for 1 1/2 cups of the mixed puréed berries
-I haven't tried this version - but when I do I might add some cinnamon and a pinch of nutmeg....

Happy Cooking! 

Wednesday, November 16, 2011

Makin' Bacon.

The intention for this post was to talk about the next Culinary Arts course I took, Culinary Arts II... 

...I am going to go out of sequence here a little and talk about Bacon.  I love Bacon.  All types of Bacon.  It makes me happy. 

A couple of weeks ago I started the newly offered Butchery and Charcuterie class at GBC.  I really had no idea what to expect.  I enrolled in it because butchery seemed like a good skill to have.   To my delight, I discovered that on the first day of class, (bright and early on a Saturday morning) we were 'makin' bacon'!  I was like a kid on Christmas.  I had a big goofy smile on my face for the whole class.  

First, we were given a pork belly and the ingredients to make a rub for the pork belly in order to 'dry cure' it.  After rinsing, drying and scoring the skin side of the pork belly with a knife, we massaged it with the rub and left it to cure for the week in GBC's industrial-sized fridges. 

Pork Belly Rub for Dry Curing
(for 6KL pork belly)
216g kosher salt
108g brown sugar
21g INSTA CURE NO.1

(look at that colour!  Perfection...)

The next week....
We massaged it once again with maple syrup (Mmmmm....maple syrup).  And then smoked it in an oven (@350 degrees for about 3 hours, skin side up) with wood chips. 


(see that brown stuff in the pan?  I totally stuck my finger in it....It tasted like maple-fatty-goodness)

I felt pure joy through the whole process of bacon making.  I have a feeling its because I love bacon so much.  (and no, I do not have a problem...lol)

One of the best things I found with 'makin' bacon' is that the method demonstrated in class is completely replicable at home (and after tasting the end product, I would say that it's definitely worth doing).  We soaked and heated the wood chips (in a foil pan) on a stove top until they began to smoke, at which point we covered them with a foil cover.  We then poked holes in the foil cover so all that yummy smoke could infuse the pork belly in the oven. 

When I attempt this at home, I think I will be using a backyard bbq as I (unfortunately) do not have the industrial fans that the George Brown kitchens do to suck all the smoke that is emitted out before everything (jackets, furniture, carpets, clothes, hair etc.) smells like smoking wood (don't get me wrong, eau de 'camp fire' is great, but only to a certain extent).

So far, the Butchery and Charcuterie course is getting a big *thumbs up* from me...and there is still a whole class on sausage making to come!

Happy Cooking!