Showing posts with label Dessert. Show all posts

Thursday, June 14, 2012

Dairy Free Berry Cupcakes


I have a little munchkin in my life who can't have dairy.  Now, I imagine that it’s hard to avoid dairy when you have a kid, considering all of the ready made foods and snacks out there that kids love which contain dairy....and I knew I would be seeing his mama so I thought I would send these along with her for him to try - Dairy Free Berry cupcakes.   Fresh berries are in abundance at this time of year in Ontario, which is perfect for this recipe.....


Dairy Free Berry Cupcakes
(Adapted from 500 cupcakes)
Serves 12


Ingredients:

2 1/2 cups mixed fresh berries (blueberries, strawberries, cranberries, blackberries - I used blueberries, and strawberries)
2 cups all purpose flour
1/2 cup packed brown sugar
1 tbsp baking powder
2 tsp vanilla extract
1/2 tsp almond extract
4 tbsp vegetable oil
2 lightly beaten eggs

1/2 cup mixed berry jam

Directions: 

(1) Preheat the oven to 350 degrees
(2) Line a muffin pan with cupcake liners
(3) In a food processor, puree 1 1/2 cups of the berries until smooth
(4) in a small bowl, dice up the remaining berries
Diced strawberries...
(5) In a medium mixing bowl, combine the flour, sugar and baking powder; set aside
(6) In a large mixing bowl, combine the eggs, oil, vanilla and almond extract
(7) Add the puréed berries to the wet ingredients
(8) With a spatula, fold in the dry ingredients
(9) Fold in the remaining diced berries
(10) Spoon the batter into the cups
-I put about a heaping 1/4 cup of batter in each cupcake cup...they will rise a bit as they are baking...
(11) Top each cupcake with a teaspoon of jam
-I used the Smuckers 'no sugar added' Strawberry variety
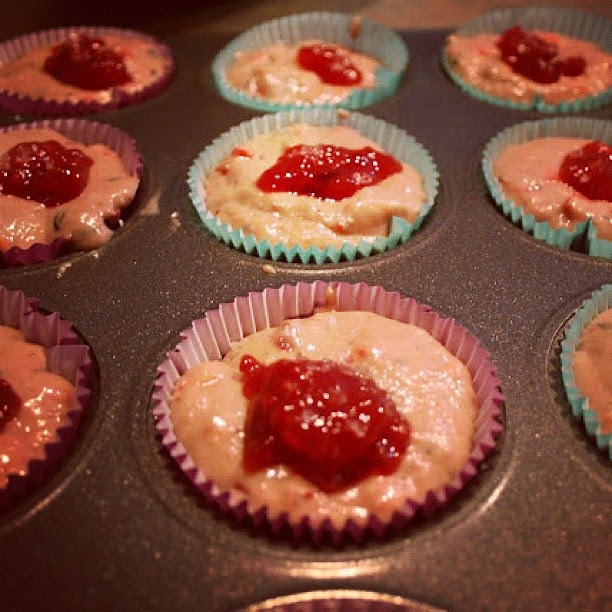
Ready to bake!

(12) Bake for 20 minutes or until toothpick is dry
(13) Remove pan from oven and cool for 5 minutes
(14) Remove the cupcakes and cool completely on a rack
-These can be stored in an airtight container for up to 3 days & frozen for up to 3 months...


Nutritional Information (for one cupcake):
Calories 199
Fat 5.5g
Carbs 33.2g
Fibre 1.7g
Protein 3.2g
Sugar 15.6g
Sodium 92.7mg
WW points 5

Optional - If you are not too concerned about your sodium intake, I put a couple of large salt crystals on top of the strawberry jam (prior to baking) to add to the flavour dimensions...

There are a couple of yummy alternatives to the berries:
Peach and berry cupcakes
-substitute 1 1/2 cups canned peaches - puréed, for 1 1/2 cups of the mixed puréed berries
Apple and berry cupcakes
-substitute 1 1/2 cups unsweetened apple sauce for 1 1/2 cups of the mixed puréed berries
-I haven't tried this version - but when I do I might add some cinnamon and a pinch of nutmeg....

Happy Cooking! 

Sunday, May 27, 2012

Blue Hydrangea Red Velvet Cake


I think I could sum up this post with two words....'lesson learned.'

Last weekend was Victoria Day here in Canada.  Which means that it was the first long weekend of the summer.  My pregnant cousin happened to be visiting from Calgary (that's in the province of Alberta for those of you who need to brush up on your geography).  And since this was probably the last time we would see her before she had the baby, the visit called for a Baby Shower! 

She's having a boy, so I thought that some sort of blue cake was in order.  I took my Red Velvet cake recipe, replaced the red food colouring with Wilton's Royal Blue food colouring and a dab of Wilton's Violet food colouring to make (are you ready...?) - Blue. Velvet. Cake. 
Once baked, the cake was a lovely rich royal blue colour and it even tasted great (I sort of expected it to taste 'blue').  For some reason, while I was sampling the cake, I caught a reflection of myself in the mirror - my tongue was royal blue, my lips were royal blue, even my teeth were royal blue.  (French accent - ahhh...horrible!) 
So after drinking a tonne of water and brushing my teeth (a couple of times) (...with the fancy whitening toothpaste),  I decided to scrap the idea and go back to the original 'tried and true' red velvet cake recipe.

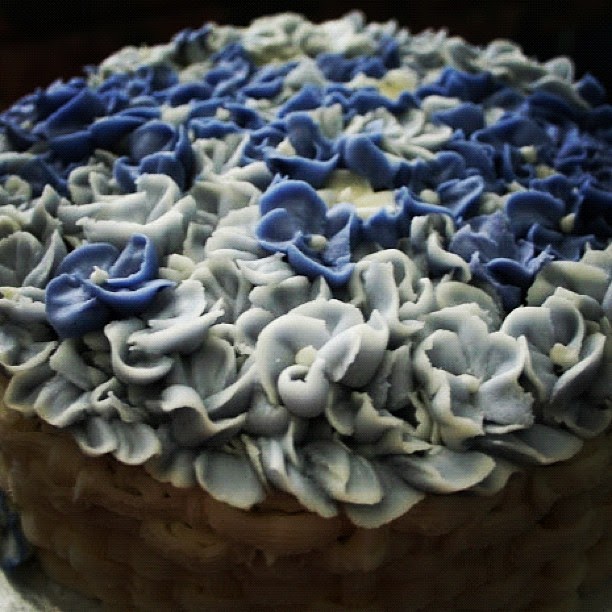
I played around with a couple of icing techniques and (since she's having a boy) went with various shades of blue hydrangea's.   


The cake was devoured within minutes (seriously...I should have timed it) and I received lots of compliments (win!). 

I find that sometimes these mistakes are necessary for the learning process - and now I know what to do to make a person’s teeth blue...(I am going to put that into the ‘funny practical jokes’ bank)...
Maybe next time I try to make a blue cake (...I'm sure there will be a next time) I will go for a baby-blue shade instead of trying to poison myself with blue food colouring to make a royal blue cake....

Happy Cooking!

Thursday, May 24, 2012

Guyanese Custard Block

(I should probably premise this story with the fact that I am the Canadian born offspring of two Guyanese parents)...

It was my Dad's birthday a few months ago.  He's one of those people who doesn't really like a big fuss on their birthday (which I don't understand - I feel as though my birthday should be a national holiday).  Because he doesn't like a big fuss, we try to keep it low key, but special.

This year, I decided to flip through this Guyanese cookbook we had (dated 1973) and attempt something for dessert for his birthday from 'home' (anyone with Guyanese family living abroad knows that Guyana is referred to as 'back home' or just 'home')....
I love crazy cookbooks like this....you just never know what you might find in them!
In it, I found a recipe for something called 'Custard Block'.....

I thought this recipe was great for a couple of reasons (1) Because it's called 'Custard Block'...that's exactly what it is.  A block of frozen custard.  And (2) because it's main ingredient is something called 'Bird's Custard Powder'.  Now, Birds Custard Powder brings back many memories from my childhood.  It's one of the first things that my Mom would let me make on my own.  It’s a custard powder, which when you add milk and sugar to it over heat - makes this gloop-y yellow custard that my dad LOVES with any sort of pie or crumble (there were equal parts pie and custard in his bowl)...


Custard block is like ice cream without all the work.  I used fat free evaporated milk, which really lightened the recipe up.  It's a great summer dessert and really easy to make.  

Fat-free goodness....
Guyanese Custard Block
Adapted from 'What's Cooking in Guyana' Cookbook
Serves 6
 
Ingredients:

Two 12oz cans of fat free evaporated milk (could use the full fat evaporated milk as well...).
3 tbsp Birds Custard Powder
3 tbsp brown sugar
1/2 tsp cinnamon
1/4 freshly ground nutmeg
1/2 tsp almond extract
1 tsp vanilla

Directions:

(1) In a medium pot, whisk together all the ingredients.
(2) Put the mixture on the stove and turn on heat to medium-high.
(3) Stir constantly.  The idea here is to heat the custard mixture until it thickens slightly.  (on average - 8-9 minutes)
-if you don't continuously stir, it will get too lumpy quickly (and you'll have to start all over!)
-The mixture is ready when it coats the back of the spoon and doesn't pull away from the edges of the spoon...
Not ready....

See how it's pulling away from the edges of the spatula?.....Still not ready.....
Ready!
(4) As soon as mixture has started to thicken, remove from heat and pour into the desired container. 
-I used a mini muffin pan.  Other ideas for containers are - popsicle holders, ice cube trays, mini pie plates, ramekins.... 
(5) Freeze for at least 5-6 hours
(6) When ready to serve, remove from freezer and run the bottom of contain through warm water to loosen the custard block to make it easy to pop out. 
-Optional - when serving , sprinkle with a smidge of cinnamon.
Custard Block!  Ready to serve....
Nutritional Information (for one serving - 1/6 of the final product):
Calories 151
Fat 0.2g
Carbs 28.3g
Fibre 0.1g
Protein 8.2g
WW Points 3

Happy Cooking!

Thursday, April 26, 2012

Oreo Cadbury Mini Eggs Cheesecake Cupcakes

Okay, so this recipe is similar to the Oreo Cadbury Mini Eggs Easter Squares, but lightened up and made into cheesecake cupcakes.
I made these for my Uncles birthday.  He likes dominos....hence the theme for these cupcakes.
The Oreo Cadbury Mini Eggs Easter Squares (which are actually just cheesecake bars) were such a hit at Easter that I decided to use that recipe - but lighten it up a little (because there were copious amounts of icing involved this time around).  Instead of heavy cream I used fat free evaporated milk.  Instead of full fat cream cheese, I used the one that was reduced fat by 25%.  And I didn't put any crushed Cadbury Mini Eggs in the Oreo crust like I did last time.  Even with these modifications, they still came out great...

(Another reason for making these is that I still had Cadbury Mini Eggs leftover from Easter - which makes going sugar free REALLY hard....So I figured this was a good way to use them up so I could avoid the temptation altogether...)

I cheated and bought Wilton's black icing to make the dominos (because if there is one thing I learned in my cake decorating class - it's that making black icing is just too involved...).

Oreo Cadbury Mini Egg Cheesecake Cupcakes
Makes 24 cheesecake cupcakes

Ingredients:

Crust:
1 package of Double Stuffed Oreos, cookies and cream separated
6 tbsp butter, melted to liquid (but not smoking hot)

Filling:
16 ounces cream cheese, room temperature
1/2 cup of sugar
2 eggs
2 tsp vanilla extract
1 tsp almond extract
2 tbsp fat free evaporated milk
8 ounces Cadbury Mini Eggs

Frosting:
5 oz cream cheese (room temperature)
1/4 cup butter
The cream that you dug out from the middle of the Oreo’s
1 tsp almond extract
1 tsp vanilla extract
3 cups powdered sugar (more may be required if you need stiffer icing)
Directions:

Crust:
(1) Preheat the oven to 325 degrees
(2) Line cupcake baking sheet with cupcake holders
(3) Take the cookie part of the separated Oreo cookies and crush them
-this can be done with a rolling pin, or food processor (I used a food processor – easy peasy)
(4) Using a spatula, combine the Oreo crumbs and butter
(5) Press 1 tablespoon of the Oreo mixture into the bottom of a each cupcake holder
I use the bottom of a glass to make sure the crust is packed in firmly 
(6) Bake at 325 degrees for 8-10 minutes.
-bake until it sets
(7) Remove from oven, set aside and let cool

Filling:
(1) Crush Cadbury Mini Eggs
-This can be done with a rolling pin or food processor or mortar and pestle
(2) With an electric mixer on medium speed, combine cream cheese and sugar until smooth
(3) Add eggs, vanilla & almond extract and evaporated milk.  Mix until combined.
(4) Add crushed Cadbury Mini Eggs, mix until combined
(5) Pour batter into cupcake holders on top of the cooled Oreo crust.
                -I usually just eyeball the ‘dividing evenly’ part of this….
Ready to bake!
(6) Bake at 325 degrees for 45 minutes
(7) Turn the oven off.  Leave pan in the oven for 5-10 minutes more.
(8) Let the cheesecake cupcakes cool to room temperature before putting them in the refrigerator.

Notes:
-I put a pan of water into the oven when baking cheesecakes. This helps to add some humidity to the oven in an effort to stop some of the cracking that (inevitably) goes on when I bake cheesecakes. Sometimes it works, sometimes it doesn't. When it doesn't and there are cracks, I will usually either throw on some icing or fruit or just eat it as it, because in the end, it's still yummy cheesecake, cracks and all....
-Try to open the oven as little as possible - this will let some of the steam (humidity) escape.

Frosting:
(1) In an electric mixer on medium-high speed, beat cream cheese, butter and cream from the Oreos together until smooth
-the closer to room temperature these ingredients are the smoother the mixture will be
-if you are going to be icing these cupcakes with a tip, try to get the mixture as smooth as possible
(2) Mix in vanilla and almond extracts
(3) Turn the mixer to low (otherwise you'll have a big powder-y mess) and combine icing sugar
(4) Decorate!
-for the non-domino cupcakes I used a 2D Wilton tip for the swirl


Happy Cooking!

Thursday, April 12, 2012

Oreo Cadbury Mini Egg Easter Squares


Sometimes I'll take two things I love - like Oreos and Cadbury Mini Eggs - and combine them, thinking - since they are so good on their own - together can only be better.  Sometimes it's an epic fail....

But sometimes, it's a major win! This is what happened with this mashup of Oreo cookies, Cream Cheese and Cadbury Mini Eggs...
Cadbury Mini Eggs are one of the best things about Easter!
The inspiration for this recipe came from a lovely blogger - Buttercream Blondi - who's creations are always gorgeous and inspiring. 

I realize that this post is little after the fact (considering Easter was last weekend) but I really think that these would be good any time of the year with any candy covered chocolate (M&M's, Reese’s Pieces etc). 

Oreo Cadbury Mini Egg Easter Squares
Makes about 24 squares (depending on how big you cut them)

Ingredients:

Crust:

1 package of Double Stuffed Oreos, cookies and cream separated
5 tbsp butter, melted to liquid (but not smoking hot)
6 ounces of Cadbury Mini Eggs

Filling:
(Adapted from Buttercream Blondi)

16 ounces cream cheese, room temperature
1/2 cup of sugar
2 eggs
2 tsp vanilla extract
1 tsp almond extract
2 tsbp heavy cream
8 ounces Cadbury Mini Eggs
  
Directions:

Crust:

(1) Preheat the oven to 325 degrees
(2) Grease the bottom of a 8" square pan with butter
(3) Take the cookie part of the separated Oreo cookies and crush them
-this can be done with a rolling pin, or food processor (I used a food processor – easy peasy)
(4) Crush the Cadbury Mini Eggs
-I did this with a mortar and pestle.  However I am sure a good couple of whacks with a rolling pin would suffice.
It looks like a massacre of Caburys Mini Eggs was discovered in dirt! 
(5) Using a spatula, combine the Oreo crumbs, Cadbury Mini Eggs and butter

(6) Press into the bottom of your greased square pan
(7) Bake at 325 degrees for 8-10 minutes.
-bake until it sets
(8) Remove from oven, set aside and let cool

Filling: 

(1) Crush Cadbury Mini Eggs
-This can be done with a rolling pin or food processor or mortar and pestle

(2) With an electric mixer on medium speed, combine cream cheese and sugar until smooth
(3) Add eggs, vanilla & almond extract and heavy cream (mmmm...creamy...).  Mix until combined.
(4) Add crushed Cadbury Mini Eggs, mix until combined
(5) Pour the batter on top of the cooled crust
(6) Bake at 325 degrees for 45 minutes
(7) Turn the oven off.  Leave pan in the oven for 5-10 minutes more.
(8) Let the bars cool to room temperature before putting them in the refrigerator.
(9) Refrigerate overnight before cutting them.  A really good sharp knife should do the trick...


Notes:
-I put a pan of water into the oven when baking cheesecakes.  This helps to add some humidity to the oven in an effort to stop some of the cracking that (inevitably) goes on when I bake cheesecakes.  Sometimes it works, sometimes it doesn't.   When it doesn't and there are cracks, I will usually either throw on some icing or fruit or just eat it as it, because in the end, it's still yummy cheesecake, cracks and all....
-Try to open the oven as little as possible - this will let some of the steam (humidity) escape.

Warning: these are addictive...
On that note...
You know when you make something really sugary and yummy and you can't stop eating it...so you give most of it away thinking that you'll be able to exercise some self control and won't binge on the few tiny squares that you've kept, but then you do....This may or may not have happened to me a couple of days ago.... 
I am a believer in the 'everything in moderation' philosophy towards food....so in a effort to curb my seemingly increasing sweet tooth (and after the 60 minutes episode I saw a couple of weeks ago about sugar toxicity), I’ve decided to go sugar free (just refined sugars, not the naturally occurring stuff - like what's in fruit) for the rest of the month.  It's day two (and yes, I cheated once yesterday) I have a headache and it feels a little like I'm being tortured... 
Buckle up.  This is not going to be pretty.... 

Happy Cooking!

Thursday, March 1, 2012

Red Velvet Cake


I have been having love affair with Red Velvet Cake for about 5 years now.  I discovered the wonderful that is the red velvet cake when I was visiting family in Florida.  And now, I love anything red velvet (except for this red velvet latte I tried last Christmas...lets just say that my taste buds were offended by it...).   There is something so deliciously perfect about the combination of red velvet cake and cream cheese icing.  It's not often that we find red velvet cakes in the supermarket or bakeries here in Canada (it's just not as popular here as it is in the USA) so I have been on a mission to spread the 'Red Velvet Word' ever since.

After discovering red velvet, I also set out on a quest to find the perfect red velvet cake recipe.  There were so many out there that I had a problem finding one that was (1) A rich deep red colour - not brown-ish red (2) Had a hint of cocoa that was not overwhelming (3) Perfectly moist, because really, who likes a dry cake?!?  I used a recipe I found here and here as a base and adapted it to my liking. 

So, I am not a cake decorator (can't be good at everything).  I took a cake decorating class with my best friend a couple of years ago and I failed miserably.  I have always had a *very slight* tremor in my hand.  It's not noticeable, but has meant that I would never have had a career as a surgeon...and apparently also meant I would never be able to write well with icing on a cake - the instructor couldn't understand why my 'Happy Birthday' looked like a font out of a 1950's horror movie.  But one day I stumbled across this rosette icing technique on 'I am Baker'.  I found it super easy and not incredibly time consuming.  I love the look of the rosettes clustered on cakes and cupcakes.  I used a 2D tip instead of the suggested 1M (because that's what I had from the cake decorating class) and it worked fine. 

These are not roses...they are cupcakes!!!
(I have only made this cake using a scale to measure out the ingredients.  The next time I make it, I will convert the measurements to cups and update... )

Red Velvet Cake
Makes 2 9"cakes or 24 cupcakes


Ingredients:

5 1/2 ounces all purpose flour
4 ounces cake flour
1/2 ounce natural cocoa
1 tsp baking powder
1/4 tsp baking soda
1/2 tsp salt
1 cup low fat buttermilk
1 fluid ounce red food colouring
1 tbsp white vinegar
2 tsp vanilla extract
1 tsp almond extract
10 1/2 ounces dark brown sugar
4 ounces of unsalted butter, room temperature
2 whole eggs, room temperature

Cream cheese frosting (recipe follows)

Directions:

(1) Preheat oven to 375 degrees
(2) Line the bottom of two 9" pans with parchment paper, rub the sides of the pan and the parchment paper down with butter or line 2 standard muffin tins with paper liners, set aside
(3) In a small mixing bowl, whisk flour, cocoa powder, baking powder, baking soda and salt; set aside
Flour, cocoa powder, baking powder, baking soda & salt...
(4) In a separate bowl, whisk buttermilk, vinegar, vanilla extract, almond extract and red food colouring; set aside
Buttermilk, vinegar, vanilla, almond & red food colouring...

(5) With an electric mixer on medium speed, combine butter and sugar and mix until light and fluffy
(6) Add the eggs one at a time, mix until combined
(7) Turn the speed on the mixer to low, add the flour mixture in 3 instalments, alternating with the buttermilk mixture; mix on low speed until smooth (about 30-45 seconds)
(8) Divide the batter between the two 9" pans or two muffin pans
I love the deep red colour of this batter....
(9) Bake 9" pans for 30-35 minutes or muffin pans for 18-20 minutes, until the center of the cake springs back when pressed
-Cupcakes will take less time to bake then a full cake. 
(10) Remove the pans from the oven and let sit for about 10 minutes before removing the cake from the pans. 
(11) Let the cakes cool completely ( at least 1-2 hours) before frosting


Cream Cheese Frosting

Ingredients:

1 pound icing sugar
12 ounces cream cheese (room temperature)
3 ounces unsalted butter (room temperature)
1 1/2 tsp vanilla
1/2 tsp almond extract
Pinch of salt

Directions:

(1) Combine the cream cheese and butter on medium speed until just blended
(2) Add the vanilla and salt, mix until combined
(3) Turn the speed of the electric mixer to low (or you will have a big powder-y mess) add the powdered sugar in 4 batches beating until smooth. 

***If icing is not stiff enough to decorate with, place in fridge for 1/2 hour or add more powdered sugar until desired consistency is reached.  (I do this 1/2 cup at a time if needed)
***Alternately, if icing is too stiff, add a tiny touch of water until desired consistency is reached. 

Sometimes I double the recipe for the icing depending on how elaborate I am going to be with the icing of the cake.  The extra icing can always be refrigerated and frozen, for the next time....


Happy Cooking!