Showing posts with label Red Velvet. Show all posts

Wednesday, August 29, 2012

Food Adventures: The Canadian National Exhibition, 2012

The Canadian National Exhibition (a.k.a. The CNE or The Ex) comes to Toronto for the last 3 weeks of August every year.  Basically it’s a giant fair (it's also a signal that summer is coming to an end…and although this is a sad thought, it also means that I am all that much closer to Starbucks bringing back their Pumpkin Spiced Lattes!).

I’ve been going every year since before I can remember.  The CNE has everything from carnival rides to farm animals,  a world bazaar where you can buy goods from Russia to Brazil and even a building (stadium) reserved for horse shows  (where I saw the most adorable miniature horse show this year…).  It also features an entire warehouse-sized building completely devoted to food, where culinary experiences from deep fried butter to vegan delicacies (and everything in between) is available. 

This is one of a handful of days in the year where the ‘everything in moderation’ policy I try to follow when it comes to food is thrown (like a quarterback) out the window - and I go in search of all things wacky and deep fried. 

The variety of food this year at The Ex did not disappoint.  I thought I might share some of the food adventures that I had…..(I will try to do them justice - but really words can’t describe how awesome they were….!)

Red Velvet Pancakes Stuffed with Pulled Pork

This one still makes me laugh.  (in the ‘ahaha….i can’t believe someone thought of this, and that I ate it’ way). 

The red velvet pancakes were amazing (I’m totally making these at home one day). 

The pulled pork was sweeter (almost like maple syrup) then what I am used to – I think that is how these two actually went well together (don’t laugh…it really was pretty good!).

Mars Bar (are you ready for this?!?) wrapped in Bacon, Battered and Deep Fried

Of course it's also drizzled with chocolate and sprinkled with bacon bits....why not?!?
I’ve had a deep fried Mars bar before – It’s a fantastic thing.  The chocolate/nougat/caramel gets warm and gooey from being deep fried. 
Wrapped with slightly crispy bacon added a nice salty-ness to the above combination.  With all the gooey chocolate/nougat/caramel,  the texture of the bacon is barely noticeable – but the flavor is definitely there.

And from The Epic Burger people….(they did not disappoint)…
The Donut Burger

SO this was a burger with lettuce, tomato, cheese & bacon between two Krispy Kreme donuts. 
I do love me a Krispy Kreme donut…especially when they are fresh.  Surprisingly, this was not at all disgusting.  The burger ended up having a slight creamy-ness and sweet from the donuts.  I don’t know that I would have a donut burger again, but it was fun to try.   

The Behemoth

I am disappointed that I’ve never thought to do this myself.    
The Behemoth is a burger with lettuce, tomato, cheese, bacon between.....(buckle-up!) two grilled cheese sandwiches.  The grilled cheese sandwiches were made out of Texas toast.   They were not too buttery, and had a ‘lighter-then-I’m-used-to-on-a-grilled-cheese-sandwich’ toast on them.  The whole thing was amazing.  I would totally have this again and would even try making this at home.  This was truly Epic.

Rice Krispy Square, Battered and Deep Fried

This one was a bit of a fail.  There was wayyyyy too much batter and (contrary to what I first thought) the Rice Krispy (emphasis on the (K)crispy) square became soft again once it was deep fried.  So the whole thing ended up tasting like deep fried batter on a stick, covered in vanilla sauce…..Not my favourite. 

Bacon Dipped in Chocolate
This was actually pretty good.  I’ve had chocolate covered bacon and chocolate-bacon chocolate bars before - I’ve found that sometimes, the bacon flavor gets lost in all that chocolate.
 
But because the bacon was drizzled with a ‘not too sweet’ chocolate sauce, that lovely salty-bacon-y flavor that I hold so near and dear to my heart was retained. 
This was a great ‘eating’ day. 

Happy Cooking!

Sunday, May 27, 2012

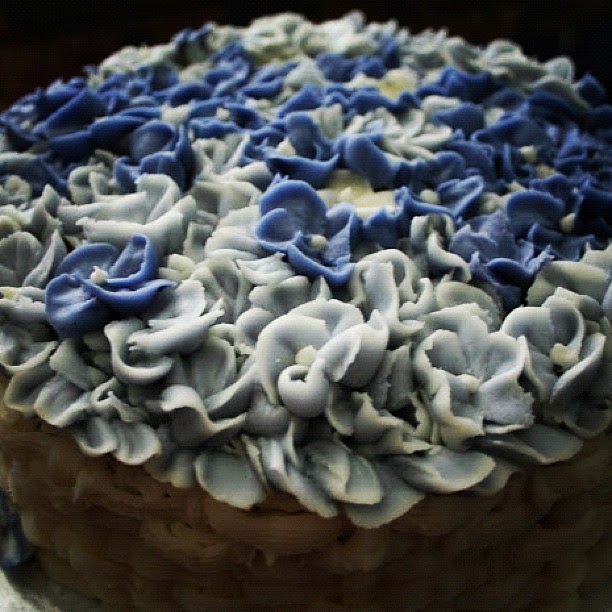
Blue Hydrangea Red Velvet Cake


I think I could sum up this post with two words....'lesson learned.'

Last weekend was Victoria Day here in Canada.  Which means that it was the first long weekend of the summer.  My pregnant cousin happened to be visiting from Calgary (that's in the province of Alberta for those of you who need to brush up on your geography).  And since this was probably the last time we would see her before she had the baby, the visit called for a Baby Shower! 

She's having a boy, so I thought that some sort of blue cake was in order.  I took my Red Velvet cake recipe, replaced the red food colouring with Wilton's Royal Blue food colouring and a dab of Wilton's Violet food colouring to make (are you ready...?) - Blue. Velvet. Cake. 
Once baked, the cake was a lovely rich royal blue colour and it even tasted great (I sort of expected it to taste 'blue').  For some reason, while I was sampling the cake, I caught a reflection of myself in the mirror - my tongue was royal blue, my lips were royal blue, even my teeth were royal blue.  (French accent - ahhh...horrible!) 
So after drinking a tonne of water and brushing my teeth (a couple of times) (...with the fancy whitening toothpaste),  I decided to scrap the idea and go back to the original 'tried and true' red velvet cake recipe.

I played around with a couple of icing techniques and (since she's having a boy) went with various shades of blue hydrangea's.   


The cake was devoured within minutes (seriously...I should have timed it) and I received lots of compliments (win!). 

I find that sometimes these mistakes are necessary for the learning process - and now I know what to do to make a person’s teeth blue...(I am going to put that into the ‘funny practical jokes’ bank)...
Maybe next time I try to make a blue cake (...I'm sure there will be a next time) I will go for a baby-blue shade instead of trying to poison myself with blue food colouring to make a royal blue cake....

Happy Cooking!

Thursday, March 1, 2012

Red Velvet Cake


I have been having love affair with Red Velvet Cake for about 5 years now.  I discovered the wonderful that is the red velvet cake when I was visiting family in Florida.  And now, I love anything red velvet (except for this red velvet latte I tried last Christmas...lets just say that my taste buds were offended by it...).   There is something so deliciously perfect about the combination of red velvet cake and cream cheese icing.  It's not often that we find red velvet cakes in the supermarket or bakeries here in Canada (it's just not as popular here as it is in the USA) so I have been on a mission to spread the 'Red Velvet Word' ever since.

After discovering red velvet, I also set out on a quest to find the perfect red velvet cake recipe.  There were so many out there that I had a problem finding one that was (1) A rich deep red colour - not brown-ish red (2) Had a hint of cocoa that was not overwhelming (3) Perfectly moist, because really, who likes a dry cake?!?  I used a recipe I found here and here as a base and adapted it to my liking. 

So, I am not a cake decorator (can't be good at everything).  I took a cake decorating class with my best friend a couple of years ago and I failed miserably.  I have always had a *very slight* tremor in my hand.  It's not noticeable, but has meant that I would never have had a career as a surgeon...and apparently also meant I would never be able to write well with icing on a cake - the instructor couldn't understand why my 'Happy Birthday' looked like a font out of a 1950's horror movie.  But one day I stumbled across this rosette icing technique on 'I am Baker'.  I found it super easy and not incredibly time consuming.  I love the look of the rosettes clustered on cakes and cupcakes.  I used a 2D tip instead of the suggested 1M (because that's what I had from the cake decorating class) and it worked fine. 

These are not roses...they are cupcakes!!!
(I have only made this cake using a scale to measure out the ingredients.  The next time I make it, I will convert the measurements to cups and update... )

Red Velvet Cake
Makes 2 9"cakes or 24 cupcakes


Ingredients:

5 1/2 ounces all purpose flour
4 ounces cake flour
1/2 ounce natural cocoa
1 tsp baking powder
1/4 tsp baking soda
1/2 tsp salt
1 cup low fat buttermilk
1 fluid ounce red food colouring
1 tbsp white vinegar
2 tsp vanilla extract
1 tsp almond extract
10 1/2 ounces dark brown sugar
4 ounces of unsalted butter, room temperature
2 whole eggs, room temperature

Cream cheese frosting (recipe follows)

Directions:

(1) Preheat oven to 375 degrees
(2) Line the bottom of two 9" pans with parchment paper, rub the sides of the pan and the parchment paper down with butter or line 2 standard muffin tins with paper liners, set aside
(3) In a small mixing bowl, whisk flour, cocoa powder, baking powder, baking soda and salt; set aside
Flour, cocoa powder, baking powder, baking soda & salt...
(4) In a separate bowl, whisk buttermilk, vinegar, vanilla extract, almond extract and red food colouring; set aside
Buttermilk, vinegar, vanilla, almond & red food colouring...

(5) With an electric mixer on medium speed, combine butter and sugar and mix until light and fluffy
(6) Add the eggs one at a time, mix until combined
(7) Turn the speed on the mixer to low, add the flour mixture in 3 instalments, alternating with the buttermilk mixture; mix on low speed until smooth (about 30-45 seconds)
(8) Divide the batter between the two 9" pans or two muffin pans
I love the deep red colour of this batter....
(9) Bake 9" pans for 30-35 minutes or muffin pans for 18-20 minutes, until the center of the cake springs back when pressed
-Cupcakes will take less time to bake then a full cake. 
(10) Remove the pans from the oven and let sit for about 10 minutes before removing the cake from the pans. 
(11) Let the cakes cool completely ( at least 1-2 hours) before frosting


Cream Cheese Frosting

Ingredients:

1 pound icing sugar
12 ounces cream cheese (room temperature)
3 ounces unsalted butter (room temperature)
1 1/2 tsp vanilla
1/2 tsp almond extract
Pinch of salt

Directions:

(1) Combine the cream cheese and butter on medium speed until just blended
(2) Add the vanilla and salt, mix until combined
(3) Turn the speed of the electric mixer to low (or you will have a big powder-y mess) add the powdered sugar in 4 batches beating until smooth. 

***If icing is not stiff enough to decorate with, place in fridge for 1/2 hour or add more powdered sugar until desired consistency is reached.  (I do this 1/2 cup at a time if needed)
***Alternately, if icing is too stiff, add a tiny touch of water until desired consistency is reached. 

Sometimes I double the recipe for the icing depending on how elaborate I am going to be with the icing of the cake.  The extra icing can always be refrigerated and frozen, for the next time....


Happy Cooking!