Tuesday, September 4, 2012

Food Adventures: Growing Hot Peppers....


Trinidad Scorpion Pepper.....apparently this one is around 1.5 million on the Scoville scale - (it's like the Richter scale, but for peppers) ....
Earlier this year, on a chilly winters day (January 2012), in the Great White North (…Toronto), I set a stack of pepper seeds into little pots with soil, added some water, covered them with plastic, and gave them my blessing to germinate - and fulfill their destiny of becoming hot hot hot peppers. (…..it was less of a ‘blessing’, and more of me just saying ‘grow dammit!’).

8 months on….many moons spent transplanting and fertilizing (and fertilizing….and fertilizing), combined with the very humid summer we’ve had here in Southern Ontario, I am proud to say that I have me some peppers!

During the germination process, I found that it was hard to tell the difference between the peppers once the seedlings started to sprout – so I spent some time labeling my pepper plant pots.  Somehow in all of my organization, it didn’t occur to me to use waterproof labels (whoops) so the few downpours that we have had this summer have pretty much washed out my labeling system – and now it’s a bit of a guessing game until the peppers have ripened up.  I know for sure that I have somewhere between 6-8 different varieties of peppers…..Instead of looking at this as a mistake, I choose to look at this as a ‘fun surprise’ in a few weeks time. 

I thought I’d share some pictures of the peppers as they are developing…
(just as a point of reference, the peppers used to make Tabasco sauce rate between 30,000 and 50,000 on the Scoville scale)....
Bhut Jolokia.....Between 800,000 and 1,000,000 on the Scoville scale....
Roatan Pumpkin Habanero...
Orange Habanero....My Dad tried this one...he said it was hot...
It is between 200,000 - 300,000 on the Scoville scale...

Black Naga....My Dad tried this one also.....he said it was really hot (his mouth was burning for about 15 minutes)....
It's between 700,000 and 800,000 on the Scoville scale. 
Guyanese Wiri Wiri Pepper.....

I'm not too sure which one this is....I'll have to wait for it to ripen up....

Red Mushroom Pepper....this one milder  - 30,000 - 50,000 on the Scoville Scale - but has a GREAT taste. 
All the flavour of a hot pepper with a lot less of the 'burn'. 
By now, you can probably guess that my (poor) Dad has the distinct (tongue-burning) pleasure (hahaha!) of being my pepper taster….
I’ll let you know what he thinks of the rest once they get ripe.  (Thanks Daddy!) 

Happy Cooking!

Wednesday, August 29, 2012

Food Adventures: The Canadian National Exhibition, 2012

The Canadian National Exhibition (a.k.a. The CNE or The Ex) comes to Toronto for the last 3 weeks of August every year.  Basically it’s a giant fair (it's also a signal that summer is coming to an end…and although this is a sad thought, it also means that I am all that much closer to Starbucks bringing back their Pumpkin Spiced Lattes!).

I’ve been going every year since before I can remember.  The CNE has everything from carnival rides to farm animals,  a world bazaar where you can buy goods from Russia to Brazil and even a building (stadium) reserved for horse shows  (where I saw the most adorable miniature horse show this year…).  It also features an entire warehouse-sized building completely devoted to food, where culinary experiences from deep fried butter to vegan delicacies (and everything in between) is available. 

This is one of a handful of days in the year where the ‘everything in moderation’ policy I try to follow when it comes to food is thrown (like a quarterback) out the window - and I go in search of all things wacky and deep fried. 

The variety of food this year at The Ex did not disappoint.  I thought I might share some of the food adventures that I had…..(I will try to do them justice - but really words can’t describe how awesome they were….!)

Red Velvet Pancakes Stuffed with Pulled Pork

This one still makes me laugh.  (in the ‘ahaha….i can’t believe someone thought of this, and that I ate it’ way). 

The red velvet pancakes were amazing (I’m totally making these at home one day). 

The pulled pork was sweeter (almost like maple syrup) then what I am used to – I think that is how these two actually went well together (don’t laugh…it really was pretty good!).

Mars Bar (are you ready for this?!?) wrapped in Bacon, Battered and Deep Fried

Of course it's also drizzled with chocolate and sprinkled with bacon bits....why not?!?
I’ve had a deep fried Mars bar before – It’s a fantastic thing.  The chocolate/nougat/caramel gets warm and gooey from being deep fried. 
Wrapped with slightly crispy bacon added a nice salty-ness to the above combination.  With all the gooey chocolate/nougat/caramel,  the texture of the bacon is barely noticeable – but the flavor is definitely there.

And from The Epic Burger people….(they did not disappoint)…
The Donut Burger

SO this was a burger with lettuce, tomato, cheese & bacon between two Krispy Kreme donuts. 
I do love me a Krispy Kreme donut…especially when they are fresh.  Surprisingly, this was not at all disgusting.  The burger ended up having a slight creamy-ness and sweet from the donuts.  I don’t know that I would have a donut burger again, but it was fun to try.   

The Behemoth

I am disappointed that I’ve never thought to do this myself.    
The Behemoth is a burger with lettuce, tomato, cheese, bacon between.....(buckle-up!) two grilled cheese sandwiches.  The grilled cheese sandwiches were made out of Texas toast.   They were not too buttery, and had a ‘lighter-then-I’m-used-to-on-a-grilled-cheese-sandwich’ toast on them.  The whole thing was amazing.  I would totally have this again and would even try making this at home.  This was truly Epic.

Rice Krispy Square, Battered and Deep Fried

This one was a bit of a fail.  There was wayyyyy too much batter and (contrary to what I first thought) the Rice Krispy (emphasis on the (K)crispy) square became soft again once it was deep fried.  So the whole thing ended up tasting like deep fried batter on a stick, covered in vanilla sauce…..Not my favourite. 

Bacon Dipped in Chocolate
This was actually pretty good.  I’ve had chocolate covered bacon and chocolate-bacon chocolate bars before - I’ve found that sometimes, the bacon flavor gets lost in all that chocolate.
 
But because the bacon was drizzled with a ‘not too sweet’ chocolate sauce, that lovely salty-bacon-y flavor that I hold so near and dear to my heart was retained. 
This was a great ‘eating’ day. 

Happy Cooking!

Thursday, August 16, 2012

Lemon Thyme Chicken (a.k.a. Poulet au Thym Citronne)

This is one of the recipes from my French Farmhouse Cooking course that really rocked my world.... 

Lemon Thyme in the garden....So pretty...
This recipe hails from the Bresse area of Burgandy, France where the famous Poulet de Bresse (chickens) are raised. 
As per Wikipedia...
These birds are highly valued for their gamey depth of flavour, yet with fine, tender flesh and delicious, clean-flowing fat. Roughly 1.2 million are raised annually, but such is the demand inside France that few birds make it out of the country. As a premium product, they sell at a premium price: Poulet de Bresse command around 15 euro ($21US) per kilo at fine food markets.
The most typical examples, known as Bény, have a distinctive red crown, white feathers and blue feet, making up the colours of the French flag, making it an ideal national mascot.

This recipe is simple, but still packed with lots of flavour.  As you long as you don't burn the chicken when you brown it (which sometimes happens to me) it's truly a one-pot dish. 
The key with this recipe is to get a good brown on the chicken before stewing. 
If you don't have lemon thyme (I've never found it in my local grocery stores….I just happen to have it because I grow it every year in my garden) use regular thyme and add a bit more lemon juice (to taste) at the end.  You'll still get a lovely lemon and thyme chicken stew. 
I served this with a basic chive mashed potatoes and some glazed carrots. 
This is most definitely what I would call 'rustic comfort food'...

More Lemon Thyme pictures....it was so pretty that I couldn't stop photographing it!
Lemon Thyme Chicken (a.k.a. Poulet au Thym Citronne)
(Adapted from 'French Farmhouse Cooking' course manual - George Brown College)
Serves 5 

Ingredients:
2 tablespoons Olive Oil
1 4-ish pound Chicken, cut into 8 pieces
Sea salt & Ground pepper
2 large Onions, Julienned (I used the large white onions...).
8 Garlic cloves, peeled and cut in half
1 large handful fresh Lemon Thyme sprigs (regular thyme will work here too)  (a large handful means about 6-7 big sprigs) (tie them in a bunch with some butcher twine - pictured below)
1 bay leaf
1/2 cup low sodium chicken stock
1/3 cup fresh Lemon Thyme leaves (or regular Thyme leaves)
1/4 cup fresh Lemon juice (more if using regular Thyme)

Directions:
(1) Season (both sides) of the raw chicken with sea salt and black pepper.
(2) Heat oil in large heavy skillet (I use my dutch oven for this).
(3) Add the seasoned chicken to the skillet and brown on both sides until golden brown.
-Tips for browning chicken:
-I usually keep the heat to gas mark 8 (the high side of medium-high) - the pan has to be really hot otherwise the chicken won't brown, and will absorb a lot of the oil
-Be very careful whenever you are dealing with hot oil...it will most likely spit up at you when you put the chicken in.  Long kitchen tongs for putting the chicken in the skillet and for turning are a really great idea here
-Don't attempt to turn the chicken over if it won't release from the skillet.  If the chicken piece is sticking to the bottom of the pan (to the point where you have to dig and shred the chicken piece in order to release it) it's not ready to be turned.  Wait a couple of minutes and try again.  I usually find myself leaving a piece of chicken for 5-7 minutes on each side to get a good brown
Yummy seasoned & browned chicken...
(4) Remove the chicken from the skillet once it's brown;  set aside in a plate for later.
(5) Add onions to the skillet over medium-high heat.
-If the bits leftover in the pan from browning the chicken are black/burned (instead of being a rich brown) either wash the pot or get a new one.  You don't want to ruin your stew by adding a burned/charcoal taste to it...if you are going to use a new/clean pot to sweat the onions, add a tablespoon of oil or butter (I'd recommend butter) to the pot and let it warm up/melt before adding the onions)
Julienned Onions...Ready to sweat....
(6) Sweat the onions until they become translucent.
(7) Turn the heat to medium, add the garlic.
(8) Continue cooking until onions are golden (but not caramelized).
(9) Add the chicken, lemon thyme sprig bunch, bay leaf & 1/2 cup chicken stock to the pot.
Lemon Thyme sprigs...tied in a bunch with butcher twine....
(10) Stir well, making sure to get any bits up from the bottom of the pan.
(11) Turn the heat to medium-low, cover the pot and cook for 30 minutes, stirring once or twice.
                       -The stew should be gently simmering for the 30 minutes
(12) Remove cover.  Add lemon thyme leaves & lemon juice.  Cook for 5 minutes more.
(13) Remove from heat.  Remove the lemon thyme sprig bunch & the bay leaf.
(14) Taste for seasoning.
(15) Put the lid back on and let the stew sit covered for 10 minutes before serving.

Ready to serve!
Nutritional Information (for one serving - 1/5 of the final product):
Calories 472
Fat 10g
Carbs 10g
Fibre 1.4g
Protein 85g
WW Points 11
Happy Cooking!

Friday, August 10, 2012

French Farmhouse Cooking

Holy blog delay Batman!  (yes, I know I've said that before)....

This summer has been crazy-busy, but so much fun.  I've been to two destination weddings (Cancun and Denver), and there has been lots of fun times and food with friends and family. 

This post has been a long time coming.  My review of the French Farmhouse Cooking course I took. 
I really enjoyed this class.  The recipes were more on the 'rustic' side of cooking, with a lot of great one pot dishes.  I picked up a lot of useful information and even learned how to prepare a rabbit!  (I don't think I'll be doing that again for a while, but it was a good experience...).  This course was 6 weeks long.

Week 1: Introduction
This was a demonstration only class. 
We learned to make Tapenade aux Thon (a basic tuna tapenade), Anchoaide (people who like anchovies will like this), Canard Roti de la Belle Gasconne (roasted duck) with Pommes de Terres au Romarin Cuites au Four (roasted potatoes with rosemary - even though I am not a big fan of duck, these potatoes were roasted in duck fat which made them melt-in-your-mouth amazing), Prunes Farcis (prunes stuff with blue cheese), and Gougeres (a neutral puff, which can be used to make cheese puffs).  These are the same puffs that are used to make Croquembouche (which is one of those things that I would love to learn how to make one day). 

Croquembouche....picture c/o fine cooking...
Week 2:
This week we learned how to make Salad a L'Endive du Paludier (Salt Raker's salad - a Belgian endive salad with olive oil, salt and pepper) and Le Poisson du Paludier (Salt Rakers fish - which is fish baked in a salt crust).  The lab for this class was Porc Cuit au Lait (braised pork in milk - a dish that reflects the cuisine of Normandy).  It was great served with apples and watercress.  Echalotes Braisees (braised shallots) was also part of the lab in this class.  The shallots were sautéed with white wine, thyme and bay leaves which really brought out the mildly sweet flavours of these little onions. 

Week 3:
Rabbit week. 
Before this class, I had never actually ate rabbit before.  I do have a wild rabbit that runs around our backyard named 'Bunny' (yes, I know, it's not very original)….let’s just say that this was one of those situations where I really had to mentally separate the live animal from the one that I was going to eat/cook with.   
Tarte au Chevre (goat cheese tart) was demonstrated in this class.  It was a goat cheese tarte with leeks and cumin.  This recipe was fantastic. 
Salade de Cresson et de Betteraves aux Noix (watercress, beet and walnut salad) was also demonstrated. 
Rabbit with Sorrel was part of the lab for this class.  It was a rabbit stew with bacon and sorrel leaves.  Apart from the fact that I learned a whole lot about preparing rabbit, I wasn't a huge fan of the sorrel – it’s a little too sour/bitter for me. 
Carrots with Juniper Berries were also part of the lab.  This was a great recipe to learn the correct way to glaze a carrot (yes, there is an incorrect way to glaze a carrot....it usually involves some variation of making the glaze first and then adding cooked carrots). 

Week 4:
This week we learned how to make the national dish of the Basque people....Piperade.  It's a tomato, green pepper and ham stew which is thickened with an egg.  It looks like vomit when it's all put together, but it tastes so good...especially with some crusty fresh bread. 
Poulet au Thym Citronne was part of the lab for this week.  It's Chicken with Lemon and Thyme.  It's easy and amazing.  This recipe makes use of something called 'lemon thyme'....which I just happen to have growing in my garden every summer.  Apparently, if you don't have access to lemon thyme, it's possible to combine fresh lemon and fresh thyme over night to make lemon thyme.  This is something I plan on trying out...
Confit de Tomates (melted tomatoes) and Pistou (vegetable soup with basil and garlic) were also part of this lab. 

Week 5:
Morue Basquaise (Basque style cod) was part of the lab for this class and is one of my new favourite recipes for fish.  It's white fish (cod, halibut or tilapia) baked in a red pepper, leek and plum tomato sauce.  Super easy and tasty.  Confit de Poivrons Doux a l"ail (slow cooked red peppers and tomatoes) and Salade de Pet Sai (napa cabbage salad) was also part of the lab for this class.  These were both good side dishes.  Moules au Cidre (mussels in cider) is part of the demo in this class.

Week 6:
Asparagus aux Deux Sauces (asparagus with two sauces) was demonstrated in this class.  The first sauce is a cream sauce with chives and the second sauce was a mayonnaise mustard sauce with lemon.   These are then served with poached chilled asparagus.
Gigot a la Sauge (roast lab with sage) and Haricot Verts aux Oignons (green beans with onions) were part of the lab for this class. 

I really enjoyed this class.  The instructor was incredibly knowledgeable and was able to break down the recipes to ensure that we understood the principles behind French Farmhouse cooking. 

Happy Cooking!

Tuesday, June 26, 2012

Lemon Basil Tomato Pesto Pasta with Shrimp

Lemon Basil in the garden....

Southern Ontario is experiencing a wonderfully warm and steamy summer so far, which means that it's only June 23 and my garden looks like the 'after' picture from a Miracle Grow commercial.  This weekend I was delightfully surprised to find that my lemon basil plant already had enough leaves to make pesto....(YAY!). 

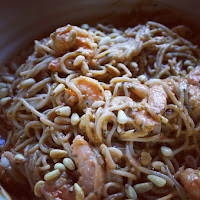
A couple of years ago, on one of my yearly trips to Florida, my aunt made this memorable Tomato Pesto Pasta with Shrimp.  You know how some dishes (for whatever reason) just stick with you (this happens to me all the time)....this pasta dish was no exception.  So I thought I'd take a crack at replicating it....and it turned out to be a TOTAL SUCCESS.

This recipe will give you left over pesto, which can stay in the fridge for a few weeks.  It has a fresh taste (from the lemon basil) and light richness (from the roasted garlic and roasted tomatoes) that would be great with baked fish, baked chicken, as a spread on a baguette (mmmm, baguette)....etc.
Mmmmmm...pasta....
Lemon Basil Tomato Pesto Pasta with Shrimp

Ingredients:

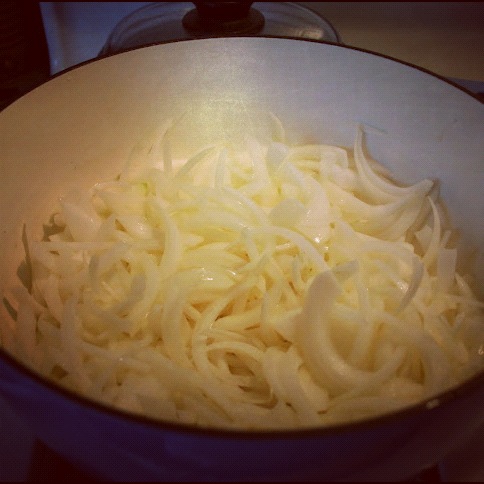
20 cloves of garlic, peeled
1/2 cup of olive oil, plus a little more for roasting tomatoes
1 pound cherry tomatoes, washed and drained
1/4 cups + 2 tablespoons pine nuts
1/4 grated Parmesan
Salt and pepper
1 cup packed lemon basil leaves, rinsed and drained (regular basil will work just as well)
1 package of brown rice spaghetti (standard package is 454g)  (any pasta will work here - just modify the cooking time according to the package instructions)
1 pound large shrimp, shelled and deveined

Directions:

Pesto:
(1) Preheat oven to 375 degrees
(2) Place garlic in a single layer in a small baking dish
(3) Add 1/2 cup of olive oil to the dish, making sure all of the garlic cloves are coated
(4) Cover the baking dish with foil.  Roast garlic cloves in the oven for 45 minutes until fragrant and golden brown
(5) In a medium sized baking dish, toss the cherry tomatoes with enough olive oil to lightly coat (about 2 tablespoons)
(6) Place the tomatoes in the oven (at the same temperature --- 375 degrees) and roast (uncovered) for 25 minutes
-Tomato skin should be blister-y when they are ready
Roasted Tomatoes...
(7) While the garlic and tomatoes are roasting in the oven (your kitchen should smell really yummy by now), in a small fry pan on the stove, over medium heat, toast all of the pine nuts for about 15-20 minutes or until they are golden brown, turning occasionally so they don't burn…
-pine nuts should to be toasted before using.  There is this thing called 'pine nut mouth' that is not dangerous, but will mess with your tastebuds for a couple of days – which is not fun...

Toasting pine nuts...
(8) When the garlic is nicely roasted, remove the baking dish from the oven and remove the garlic cloves from the oil (both the garlic and the oil will be HOT so be careful).  Set the garlic aside in a small bowl.  Reserve the oil for use later.

          
Roasted garlic cloves on the bottom, garlic infused olive oil on the top...
       
(9) In a food processor, blend the roasted garlic and 1/4 cup of the toasted pine nuts until creamy
(10) Add the roasted tomatoes to the food processor (not including the olive oil from the dish the tomatoes were roasted in – this will make your pesto too liquidy) and lemon basil leaves.  Blend until smooth.
(11) Add the Parmesan.  Blend until smooth.
-while the food processor is running, add 1-2 tablespoons of the garlic infused olive oil.  This helps to bring everything together and enhances the garlic flavour.
(12) Your pesto should be the consistency of a paste now.  Season for salt.

Lemon Basil Tomato Pesto....
 Note: you will have leftover pesto. 

Pasta:
 (13) In a large pot of boiling salted water, cook pasta, stirring occasionally, until almost tender, about 8-10 minutes
-I find that brown rice pasta is super starchy.  When water is super starchy, pasta will stick together - so make sure you are using a big enough pot with plenty of salted water to assist with constantly moving the starch away from the pasta surface.
-Salt your water people.  Adding salt now will reduce the amount of salt/cheese/butter you will have to add later.
(14) Reserve about a 1/2 cup of the pasta water prior to draining the cooked pasta
-this will be used to aid in the when tossing the pasta with the rest of ingredients later....

Shrimp: (can be done while pasta is cooking)
(15) In a small fry pan over medium-high heat, add 2 tablespoons of the garlic infused oil
(16) Season the shrimp with pepper and sauté until the shrimp turn pink (about 5-6 minutes....don't overcook - rubbery shrimp is never good...)
(17) Remove from heat


(18) In a large bowl, add the cooked pasta, and some of the pesto (I usually put 3-4 heaping spoonfuls - about a 1/4 of the total amount of pesto that this recipe makes).  Toss to coat the pasta with pesto.  If needed, add a bit of the pasta water to make tossing easier. 
(19) Add the shrimp and lightly toss just to coat the shrimp.
(20) Season for salt and pepper
(21) Garnish with the 2 tablespoons of leftover toasted pine nuts. 
Optional - serve with chilli flakes and lemon wedges on the side


Nutritional Information (for one serving - 1/5 of the final product):
Calories 583
Fat 19g
Carbs 76g
Fibre 5g
Protein 27g
WW Points 15

Happy Cooking!

Thursday, June 14, 2012

Dairy Free Berry Cupcakes


I have a little munchkin in my life who can't have dairy.  Now, I imagine that it’s hard to avoid dairy when you have a kid, considering all of the ready made foods and snacks out there that kids love which contain dairy....and I knew I would be seeing his mama so I thought I would send these along with her for him to try - Dairy Free Berry cupcakes.   Fresh berries are in abundance at this time of year in Ontario, which is perfect for this recipe.....


Dairy Free Berry Cupcakes
(Adapted from 500 cupcakes)
Serves 12


Ingredients:

2 1/2 cups mixed fresh berries (blueberries, strawberries, cranberries, blackberries - I used blueberries, and strawberries)
2 cups all purpose flour
1/2 cup packed brown sugar
1 tbsp baking powder
2 tsp vanilla extract
1/2 tsp almond extract
4 tbsp vegetable oil
2 lightly beaten eggs

1/2 cup mixed berry jam

Directions: 

(1) Preheat the oven to 350 degrees
(2) Line a muffin pan with cupcake liners
(3) In a food processor, puree 1 1/2 cups of the berries until smooth
(4) in a small bowl, dice up the remaining berries
Diced strawberries...
(5) In a medium mixing bowl, combine the flour, sugar and baking powder; set aside
(6) In a large mixing bowl, combine the eggs, oil, vanilla and almond extract
(7) Add the puréed berries to the wet ingredients
(8) With a spatula, fold in the dry ingredients
(9) Fold in the remaining diced berries
(10) Spoon the batter into the cups
-I put about a heaping 1/4 cup of batter in each cupcake cup...they will rise a bit as they are baking...
(11) Top each cupcake with a teaspoon of jam
-I used the Smuckers 'no sugar added' Strawberry variety
Ready to bake!

(12) Bake for 20 minutes or until toothpick is dry
(13) Remove pan from oven and cool for 5 minutes
(14) Remove the cupcakes and cool completely on a rack
-These can be stored in an airtight container for up to 3 days & frozen for up to 3 months...


Nutritional Information (for one cupcake):
Calories 199
Fat 5.5g
Carbs 33.2g
Fibre 1.7g
Protein 3.2g
Sugar 15.6g
Sodium 92.7mg
WW points 5

Optional - If you are not too concerned about your sodium intake, I put a couple of large salt crystals on top of the strawberry jam (prior to baking) to add to the flavour dimensions...

There are a couple of yummy alternatives to the berries:
Peach and berry cupcakes
-substitute 1 1/2 cups canned peaches - puréed, for 1 1/2 cups of the mixed puréed berries
Apple and berry cupcakes
-substitute 1 1/2 cups unsweetened apple sauce for 1 1/2 cups of the mixed puréed berries
-I haven't tried this version - but when I do I might add some cinnamon and a pinch of nutmeg....

Happy Cooking!